
Krisztian Kovacs
Published on 23 April 2018


Creating buttons and REST Endpoints in Jira
Creating buttons to enhance a User Interface (UI) is pretty straightforward, but if you want your button to do a little bit more than just be clicked, you will need to add a REST endpoint.
Creating buttons to enhance a User Interface (UI) is pretty straightforward, but if you want your button to do a little bit more than just be clicked, you will need to add a REST Endpoint. REST Endpoints enable your button to connect and follow the action you want it to take.
First Steps
In this series of Gotta Script'em All blogs we will explore the capabilities of Jira through a step by step guide on creating seamless integration links between Jira and other tools. If you have a test Jira instance, you are also welcome to follow along as I will include helpful examples for you to view, including working code snippets, screenshots and explanations of the why and how.
Without further ado, let's dive in.
What's ScriptRunner?
The leading solution for automating, enhancing and expanding what is possible with Jira is ScriptRunner. If you want to know more about what is possible with ScriptRunner you can visit your Jira add-ons screen under the main administration tab.
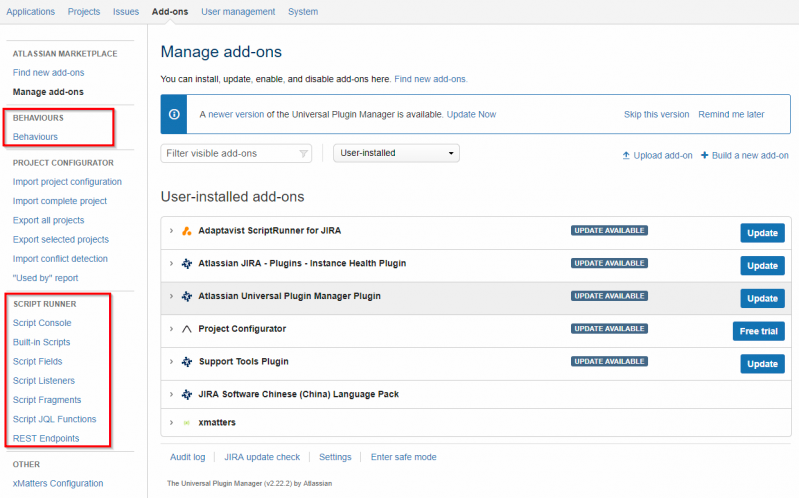
With ScriptRunner, you can play around with many different tools across many different categories. For this integration building exercise, we will focus on Script Fragments and REST Endpoints.
Script Fragments

Script Fragments are used to add extra web items, like menu items and buttons to your Jira user interface. Each item has script embedded to enable you to extend it’s capabilities. In this example, we are going to add a button on the Jira ‘issue detail’ screen so we can click on it and make it follow a simple action.
Step 1 - Click on 'New Web Item'
You can add all manner of web items to Jira but for this example we will focus on custom web items.
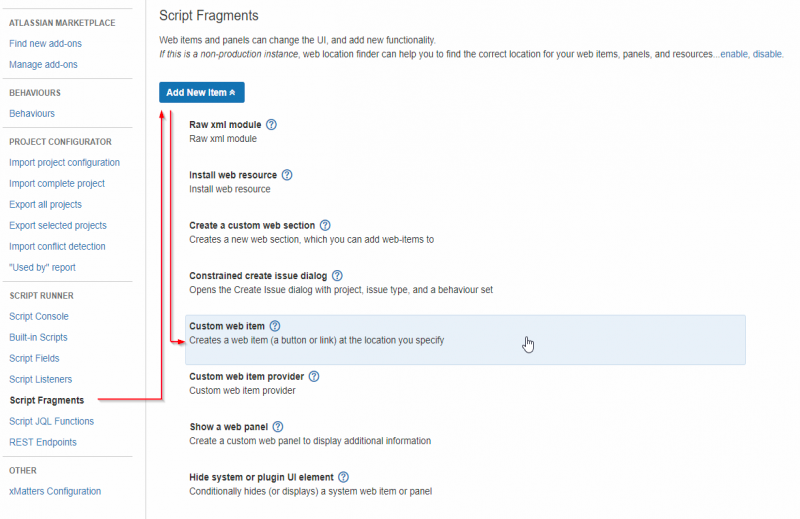
Step 2 - Click on 'Custom web item'
The custom web item can either be a button or a link. It depends on where you decide to place it on your Jira user interface. Once you have added the button or link, ScriptRunner will make it appear seamless within the original user interface design.
Step 3 - The fields you need to complete
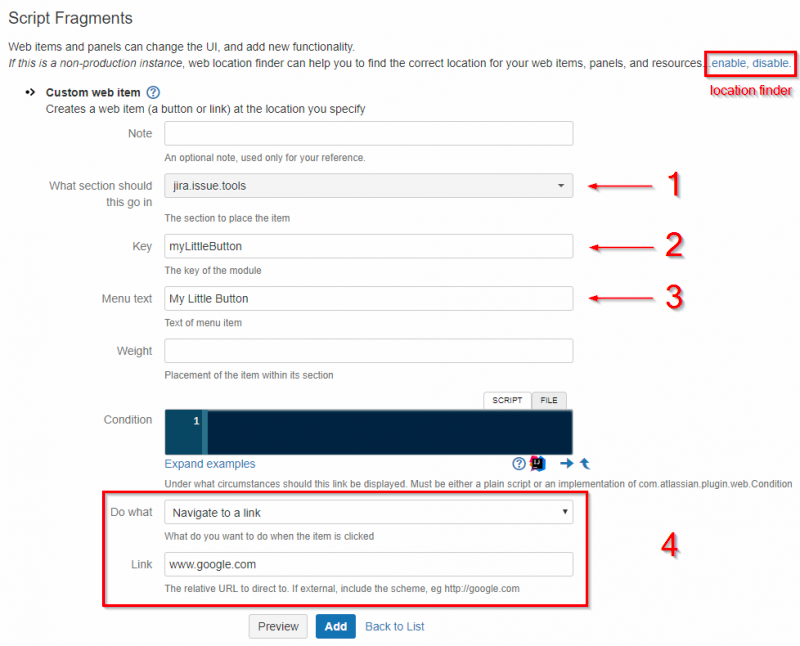
To create a working script fragment, you will need to do the following:
- Decide where you would like the Script Fragment to appear
- Assign it a unique identifier
- Add some text to describe the action it should take
- Select 'navigate to link' and add the link you would like it to follow
To locate where everything is on Jira, you will need to enable or disable the 'location finder' on the top of the page (marked red for your convenience).
If everything went well to this point, you should have a button on the ‘issue detail’ screen. For now just ignore the ‘Send xMatters’ button right next to it... it's there for a special reason..all will be revealed soon. Promise.
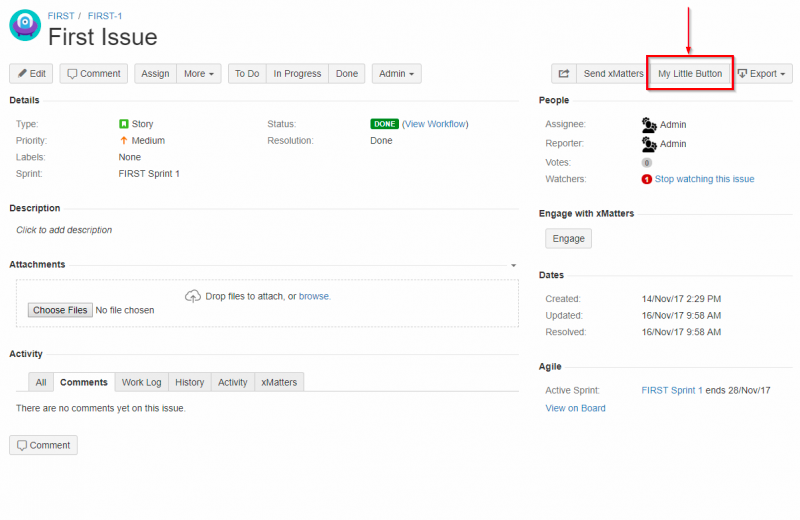
When you click on the newly created button, ‘My Little Button' it should take you to the link you included, in this example we chose google.com. It really is that easy and straightforward.
Step 4 - What do we want and when do we want it?
It's time to choose something else to do with the (creatively named) 'Do what' section. For this reason, we must add a REST Endpoint in another section of the ScriptRunner configuration.
I can hear you ask; why can't we just put the script in the Script Fragment section? The straightforward answer is it's just much better this way. Jira works with REST API calls all the time. In order to add more functionality, it's advisable to follow the structure already created. Think of it as 'best practice'.
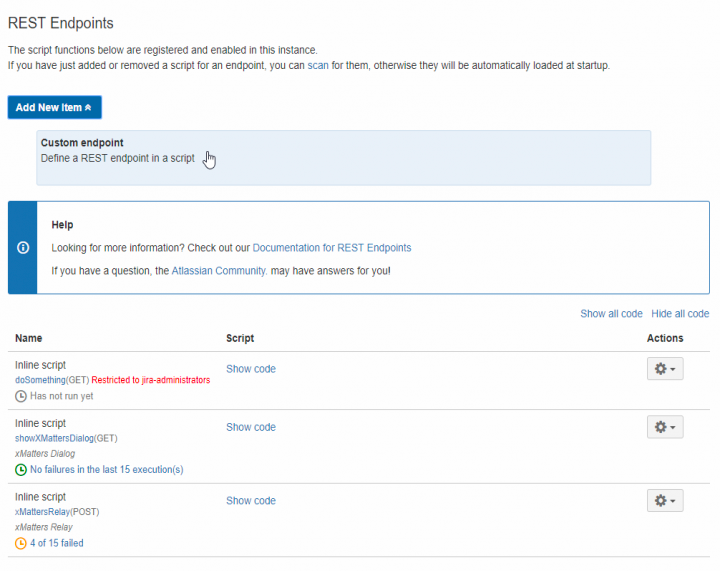
Let's consider the above screenshot for a moment, the information tells us:
- That a new script can be added
- If the script can be restricted to a specific group?
- If there have been any script failures in the last 15 runs?
If you need more detailed information about the failures, you can take a look at the logs using the 'View server log files' which is located at the bottom of ScriptRunner ‘Built-in Scripts'. Of course in our example, we won't be needing that, as what could possibly go wrong?!.
Step 5 - Copy and paste
It's time to create a REST Endpoint.
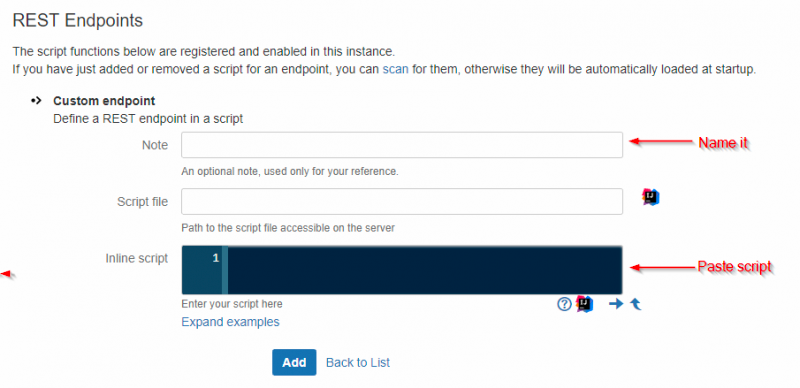
Instead of spending time going into great detail about the code we could or should use, why don’t we try some good old fashioned copy and paste coding? Let's go here and copy the code from the Dialogs (Advanced) part.
Just to make it even easier, here is the code you need:
import com.onresolve.scriptrunner.runner.rest.common.CustomEndpointDelegate
import groovy.transform.BaseScript

import javax.ws.rs.core.MediaType
import javax.ws.rs.core.MultivaluedMap
import javax.ws.rs.core.Response

@BaseScript CustomEndpointDelegate delegate

showDialog() { MultivaluedMap queryParams ->

def dialog =
"""<section role="dialog" id="sr-dialog" class="aui-layer aui-dialog2 aui-dialog2-medium" aria-hidden="true" data-aui-remove-on-hide="true">
<header class="aui-dialog2-header">
<h2 class="aui-dialog2-header-main">Some dialog</h2>
<a class="aui-dialog2-header-close">
<span class="aui-icon aui-icon-small aui-iconfont-close-dialog">Close</span>
</a>
</header>
<div class="aui-dialog2-content">
<p>This is a dialog...</p>
</div>
<footer class="aui-dialog2-footer">
<div class="aui-dialog2-footer-actions">
<button id="dialog-close-button" class="aui-button aui-button-link">Close</button>
</div>
<div class="aui-dialog2-footer-hint">Some hint here if you like</div>
</footer>
</section>
"""

Response.ok().type(MediaType.TEXT_HTML).entity(dialog.toString()).build()
}
Should you care about what the code is and how it is creating the dialog? The answer is NO.
Just create a REST Endpoint, paste the code and remember one tiny thing. Included in the code is ‘showDialog()’, that's what we need to use when changing the URL of our button.
Step 6 - A small change
There is one more simple action to take before we can rest, change the URL of our button. Every REST Endpoint you create will have the same URL, except for the last part. Take a look at this example:
/rest/scriptrunner/latest/custom/showDialog
When you paste this link into your custom web item, and change the 'do what' to 'Run code and display a dialog' you are all set.

Step 7 - What we have achieved
We have accomplished quite a lot and hopefully learned some new tips and tricks in the process.
To summarise we:
- Created a custom button on the Jira user interface
- Sent the user to google.com (on clicking the button)
- Copied a piece of code from the Adaptavist website
- Changed the google.com to our own REST Endpoint
- Experienced a great sense of pride and accomplishment!
So what's next
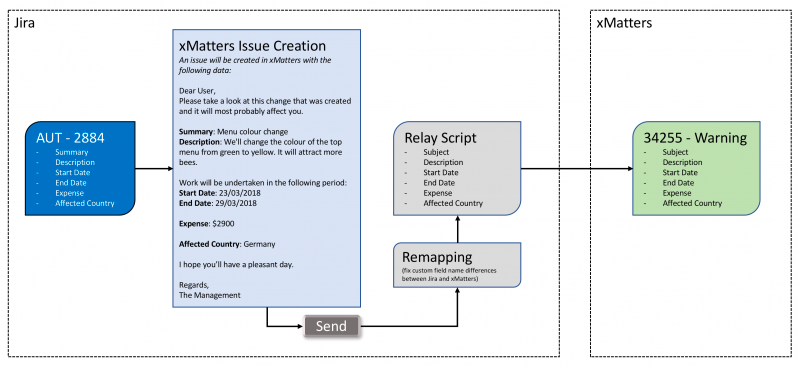
Our ultimate goal is to take all the information we need from a Jira issue, show a preview dialog of the detail and then send all the information to xMatters to create an issue.
Next post we go back to basics with a guide to writing clean code, you'll be amazed how many people don't do this. We'll show you why it's important to write code so you can make it easy to understand for anybody looking it at first time.
